
If you go for the shoot without any proper plan. You’re going to give yourself a headache.
We’ve created a guide that will help you to shoot breathtaking landscape photos.
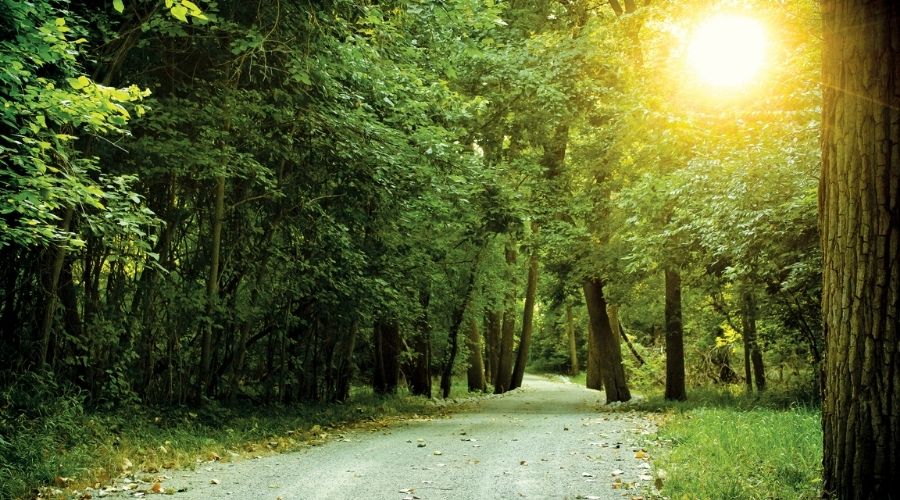
Landscape photography is one of the most rewarding and adventurous genres of photography. This post will help you to take stunning landscape photos. Much like what you see taken by professional photographers.
With that said, let’s hop right in.
#1: Use Wide-Angle Lens
If you want your landscape shots to look unique try wide-angle lenses. It allows you to capture a wider view and fit more in a single image.
A wide-angle lens gives you a detailed image even when your subject is small. It’ll save your buck money as you wouldn’t need to go for longer lenses. Even if you spent money on long lenses you have to zoom in.
So it’s better to go for wide-angle lenses.
#2: Use horizon line
The Horizon line will add a huge difference to the look of the image.
You can decide your horizon line according to the importance you want to put in. If its horizon line is lower then put more emphasis on the object that is above the sky, a big skyscraper, etc.
But,
If your placement of the horizon line is higher. Then you’re more likely to give importance to the foreground.
Pro Tip: Try capturing this with a wide-angle lens to get the best results.
#3: Create Depth Effect
Get a good grip on the depth of field is an important aspect. It is an important aspect to capture stunning landscapes.

Landscape photos need to have a sharp foreground and background. For that, you need a deeper depth of field even more than if you are taking the usual portrait photos.
This is the most common way to create the necessary depth. You can do this by setting the aperture from f/11 to f/16. This helps your prospects to see everything clearly in the image.
In another hand,
Shallower depth of field is also a powerful tool if used correctly.
In this technique, the foreground stays blurred by keeping the subject sharp. You can achieve this with a larger aperture such as f/2.8 to f/4.
#4: Capture Object In Movement
Slow down the shutter speed to capture movements in the scene. Another great way to capture the beautiful landscape views.
You can use this with moving water or clouds. Make sure you try this in your next photoshoot and impress your soulmate.
For this shoot, a neutral density filter will help you to achieve great shots of moving subjects.
In case if shoot lots of videos, a variable ND filter will be a good choice.
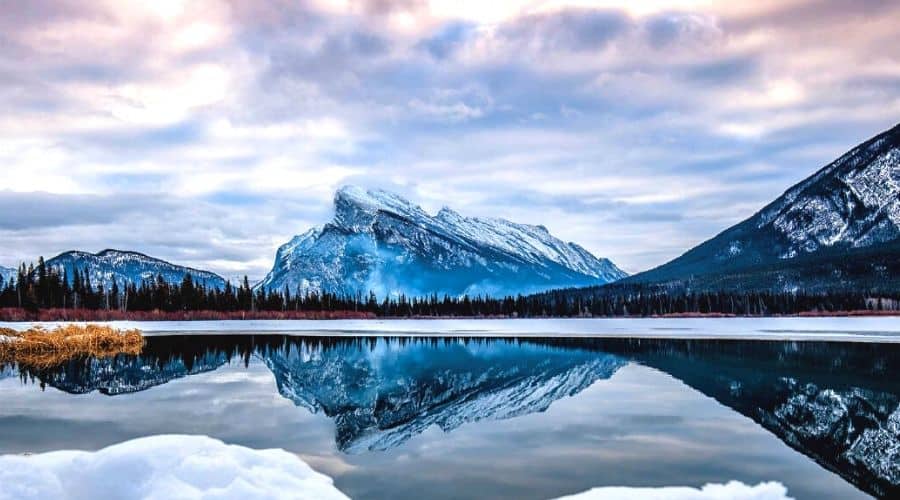
#5: Mirror Effect By Water
Capturing reflection caused by water will give another experience in landscape photography.
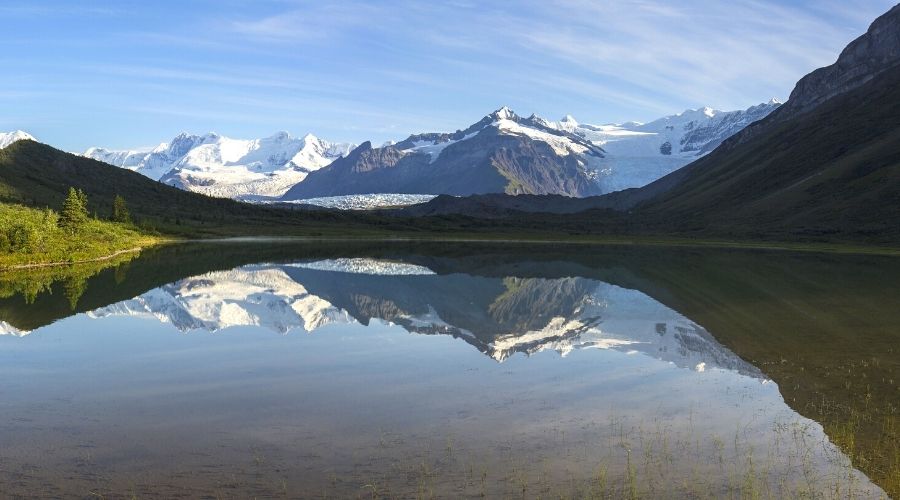
The mirroring effect not only creates depth but also duplicates a subject. It is actually awarding.
Here’s the deal,
You must make sure that your photographs are well balanced. The pictures in general need the water to be calmer. The best time to take such shots is during sunrise or sunset.
Although it’s a simple and easy technique. I’m sure that will definitely gear up your confidence with landscape photography.
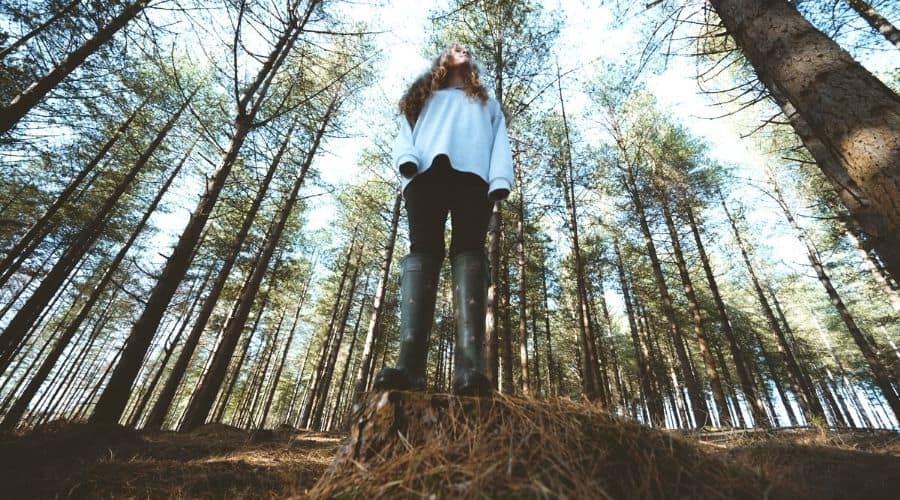
#6: Include People
Of course, Living with Non-living subjects is the perfect combination. You can include people running or jumping while taking landscape shots.
But, don’t forget the rule of thirds and place the person off-center. So that your audience should not only focus on a single subject but get the full feeling of your creativity.
The shutter speed you can use according to your need. Use a slow shutter for movement and a fast shutter for speed if you want to freeze the moment.
#7: Use Rule Of Thirds
The rule of thirds will always give you advanced photographs.
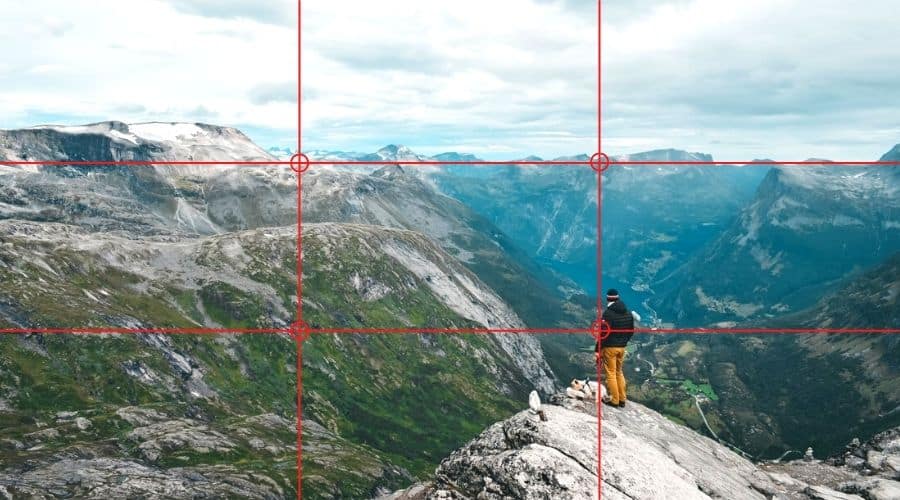
Draw two horizontal as well as vertical lines that intersect each other. It’ll break your image down into 9 sections. You’ll see 4 intersection points where lines are crossing each other.
You’ll have to place an important point of your subject on either of these intersection points. By this, your image will be more balanced and pleasing to the eyes.
Next time when you’re out to take some landscape photos, use this rule. But remember, it’s always not necessary to follow it. You need to develop your sense of when to use it and when not to.
#8: Selection of Location
A little research about your next location would lead you to take the best shots possible.
The reason behind this is because you can pick the necessary equipment if you know the place better. And more importantly, you will be familiar with the timing for a perfect shot. You may figure out the golden hour or such.
Always Reach out to the location ahead of time. This way you will be able to explore the area with different lighting conditions and later nail the shot.
#9: Patience Is The Key
We know “practice makes man/woman perfect”. And that’s how your patience would pay for the perfect landscape shots.
The key rule for a good shot is to wait enough time. This way, you can get what you were actually looking for.
Always check weather forecasts before leaving.
You wouldn’t want to spend the whole time struggling with the weather. Or worst, you end up flying in a cyclone. Just kidding. 🙂
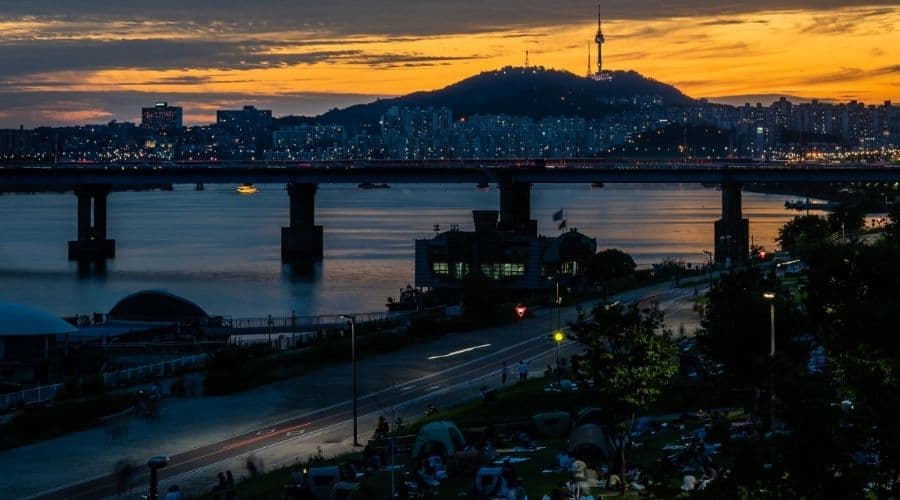
#10: Light Condition
Landscape photographers suggest the best time for a photoshoot is right after sunrise or before sunset because. The light emitted by the sun is low and that gives a good dynamic range to images.
You don’t have to worry though. You can even click good pictures during other times of the day.
If you are shooting in the middle of the day, the light of the picture won’t be attractive due to glare.
So in this case, try finding a way to soften the light.
The best part of landscape photography is you can capture wonderful shots. You’ll be able to do so even if the weather is stormy or cloudy.
Just be safe when you’re trying so and look out for tornados. Just kidding, again 🙂
#11: Carry Tripod
Tripod is essential equipment when you’re shooting outdoor photos.
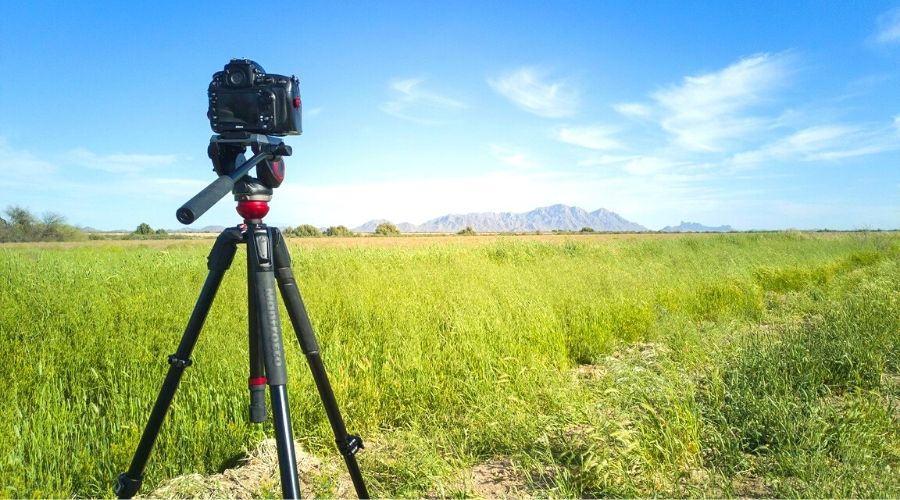
The major role tripod plays to avoid camera shake. This reduces the chance of noisy images.
If you want to capture the movement of water or clouds then a tripod becomes more necessary. It is because it’ll be hard to hold the camera for that long.
Stabilization becomes important when you shoot in long exposure. This helps you to play with more settings like low shutter speed and low ISO. That would be way harder to do if you were holding the camera in your hands.
I recommend you get an aluminum tripod that stands in tough weather conditions.
#12: Use Of Histogram
A histogram is an important tool that you can learn and improve your photos.
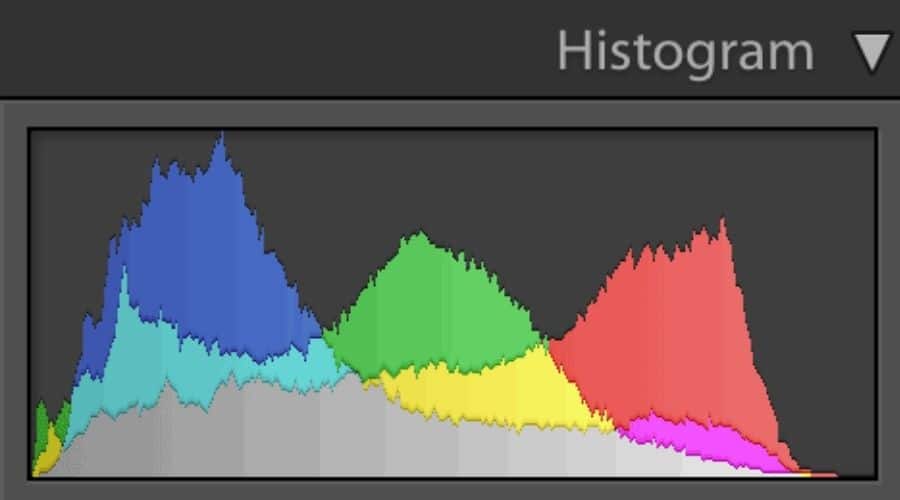
It is a graph in which dark tones are on the left and bright tones on its right side.
It’s simple when there is a shift in on the one side of the graph. This means that your photo is too dark or light. Or underexposed or overexposed in technical terms.
This is not a bad sign but this shows that your photos have lost some detail.
Don’t worry though. You will be able to correct it later by recomposing or compensating for the exposure.
#13: Raw Format Shooting
No doubt shooting in raw format will give you more information and a detailed image. Also, it offers great flexibility in further edits without losing quality.
Try clicking in raw format if your camera has the option. It’s because you can save them in other formats later as you need.
You won’t be able to convert JPEGs as RAW files.
#14: Landscapes Subjects
Flowing water:
It’s great if a river or stream flows through the landscape you are shooting. This gives weightage to your image and can be the center of interest.
Water reflections enhance the image. But, use a polarizing filter to drop some of the reflection.
Forest:
Find your area of interest whether you wanna shoot a tree trunk, a path over leaves, or flowers. One of my favorite shots when sunlight penetrating directly to the floor.
Big Flat Area:
In every landscape photography, there should be a point of interest. You don’t want your viewer to look aimlessly around the image. So try adding road, mountain, stream, etc.
Deserts:
Shooting beautiful stars with the desert is a deadly combination.
Click in the middle of the day and shoot wonderful waves caused by the heat. Or include animals like camel, dogs to the edge, and click from ground level. Background light reflection to that animal will completely blow your mind.
Seacoasts:
Although shooting near to seashore is my favorite spot among all. There are a few things to plan before shooting.
Things such as the type of shore, weather condition, and the time you planned to shoot?
What could be the best shooting option near coastal areas:
- Sandy beach.
- Storm waves pounding rocks.
- Including shoreline with clouds and sun.
- Palm trees
One personal suggestion, protect your camera and lenses from water and sand. Don’t keep your camera back opened unless you’re well sheltered.
Mountains:
Define the mountain is it rugged or worn?
Find an element that will convey your feeling to the viewer. Decide angles, light, weather, composition. Tell some details that reflect the spirit of mountains.
#15: Mid-range aperture
When you’re doubtful about the situation that what aperture to use. A rule of thumb is to use a mid-range aperture on your lens. That would produce the sharpest and detailed images.

Try capturing with f-stops numbers about two to three stops. A mid-range aperture, f/8 that works pretty well.
If your subject has some visual elements in the background, foreground, or midground. You can use f/11 to f/16 to create a high depth of field where the focus is.
Pro Tip: Don’t use a very small aperture as it will decrease the quality of your photos.
#16: Use Low ISO
Another way to improve your photo quality is to set ISO at a low point.

While the shutter speed will be slower as you’ve to set a smaller aperture. This ensures your photo quality is good with less grain.
In this case, I use the ISO range from 100-400 range that works pretty well for me.
#17: Dark effect
Neutral density filters will showcase your landscape to another level. It makes the scene darker than its actual one by reducing the light that reaches the camera.
When the scene is too bright and you have to shoot long exposure try shooting with an ND filter.
Once you’ve learned how you can use the ND filter so efficiently. Try capturing the moving water or clouds that would appear like a painting. That would certainly blow your mind.
#18: Use Polarizing filter
A circular polarizer is one of the powerful tools to get amazing landscape photos.
No matter if you’re a professional photographer or not. This unique piece of glass will make a huge difference in your photos.
It’s a fun and loving instrument. And with the help of this you can make changes in the light of the sky, clouds more defined and dramatic.
Use a polarizing filter when you are near the seashore next time. And voila, you can see fish swimming.
#19: Night Shooting
All you need is, wide-angle lens, set a tripod for the night shooting. Just mount your DSLR camera and start capturing amazing scenes.
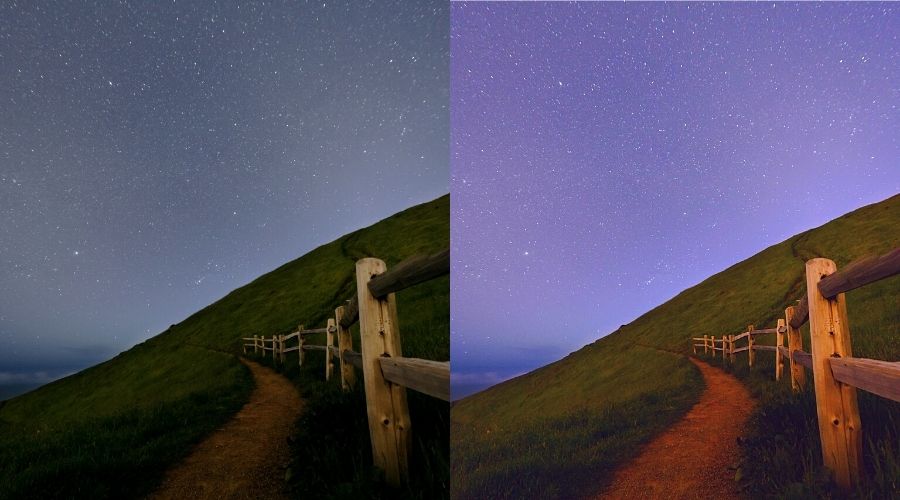
Stars, moving vehicle lights, skyscraper buildings are the best subjects to shoot at night.
Star photography needs little planning but if you are near a big city then you are more likely to get a brighter sky.
#20: Suitable Camera Settings
Modern DSLRs are good enough to click head-turning shots. It’s because they can perform so well in very low light conditions.
ISO is an important aspect to consider while clicking landscapes. Keep the ISO as low as you can. It results in longer exposure and gives you higher quality and sharper photos.
Landscape photography requires higher f-stops. Let’s say f/16 or f/22, at this point lens focuses on details in the foreground as well as background. That’ll give you a very deep depth of field.
Use slower shutter speed to shoot in high f-stop and low ISO. Remember that tripod is your friend if you want to avoid camera shaking.
#21: Capture every small detail
I sometimes put my 100% focus on the wide-angle view while working on a landscape shot.
Try looking for small details about the scene that has its own story. Also, focus on what’s unique and special about that place.
I’ve got a good grip on this recently as I’ve been doing macro photography lately. But it doesn’t have to be a close-range photoshoot for you to focus on individual details.
#22: Use leading lines
Leading lines engage the viewers and develop a sense of visual interest.
Your subject could be roads, rocks, rivers, or anything that your viewer put themselves into it.
Once you understand the concept. You can find these subjects and shoot stunning landscape photos anywhere.
#23: Use HDR, Black and white effect
Clicking with High Dynamic Range (HDR) will add sharp details and depth to your photos.
Practice with HDR and take your landscape photography to next level.
Although I don’t use it much. I find a certain place and lighting that works best for HDR.
HDR brackets the exposures of the image. It is then combined and displayed as a correctly exposed image during post-processing.
Try clicking black and white to look classic.
Most photographers alter their clicks during post-processing. For this, deep contrast is much important while the dark shadows and lighting make it cool.
#24: Use layer to an image
Using layers could be an interesting way to improve your image.
You can do this technique by just adding a foreground in your photo. It actually accentuates the subject of your image.
You can add this according to the environment you are in. It could be a flower, tree, rocks anything.
Pro Tip: Keep your aperture small to get most of the image in focus.
#25: Use triangle rule
This is not where you use the actual physical triangle.
You’ve to assume it in the environment you are in. Use your composition in such a way that creates a triangle sense. You can achieve it by adjusting your position or the different subjects in your image.
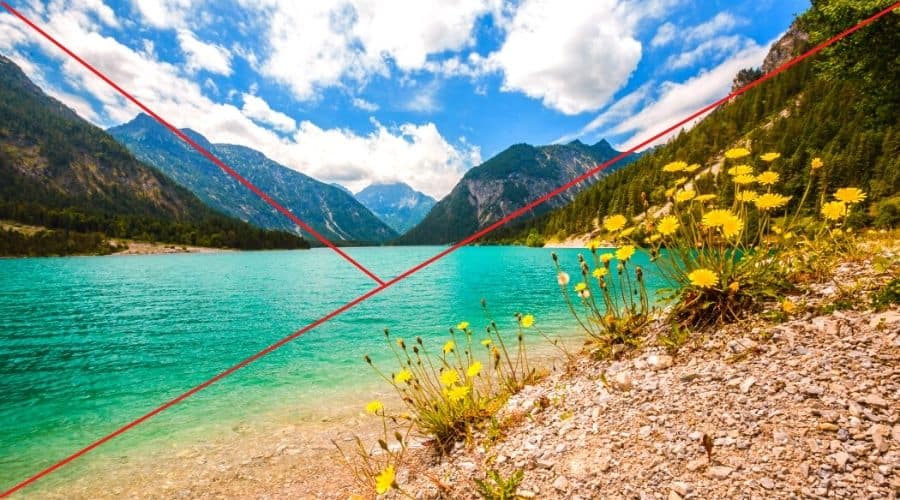
Pro Tip: Must include people and you can centralize it as a middle object out of three.
Summary
Taking good professional-looking landscape photos isn’t as complicated as rocket science.
All you have to do is learn the practice the techniques we saw. You will develop your conscience on which technique to use in certain circumstances. Once you’ve got a hang onto it you’ll bring some showcase-worthy shots when going on your hiking trip.
Just a word before you go out there. Always keep the necessary equipment and keep image quality as your priority.